|
|
| Glass replacement | Assembly, cleaning, repair |
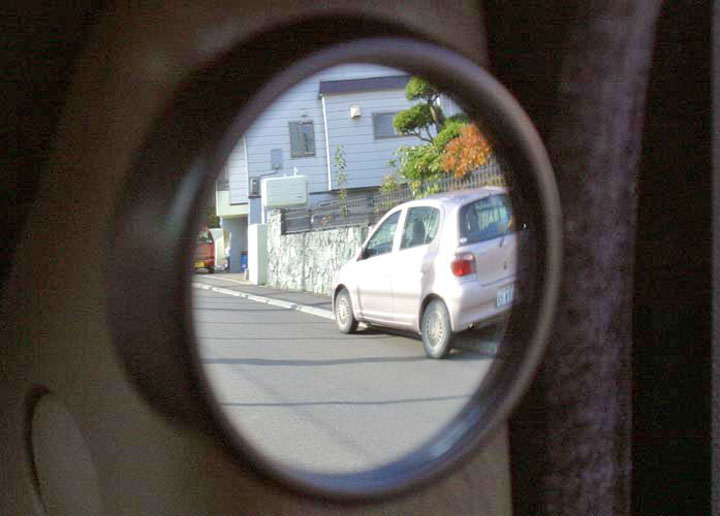
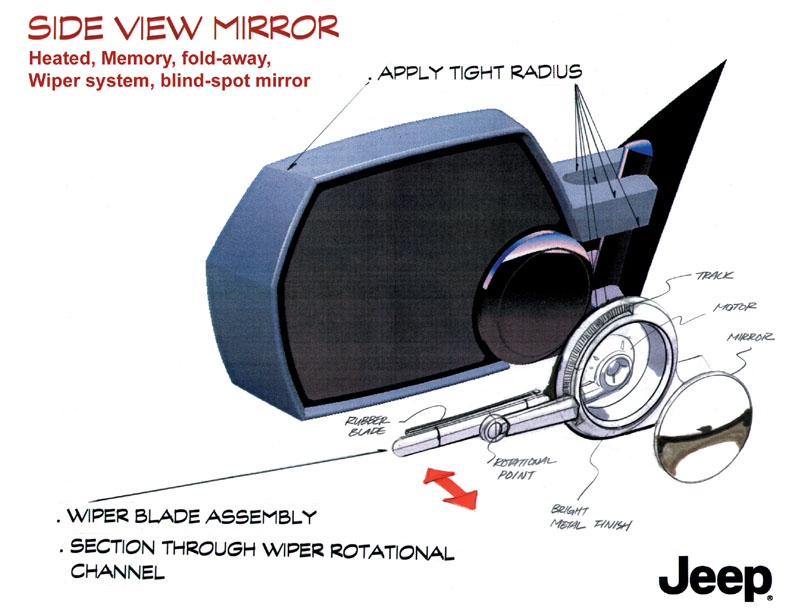
| Unique blind-spot mirror | Future concept mirror |
|
|
|
Replacing the exterior mirror glass
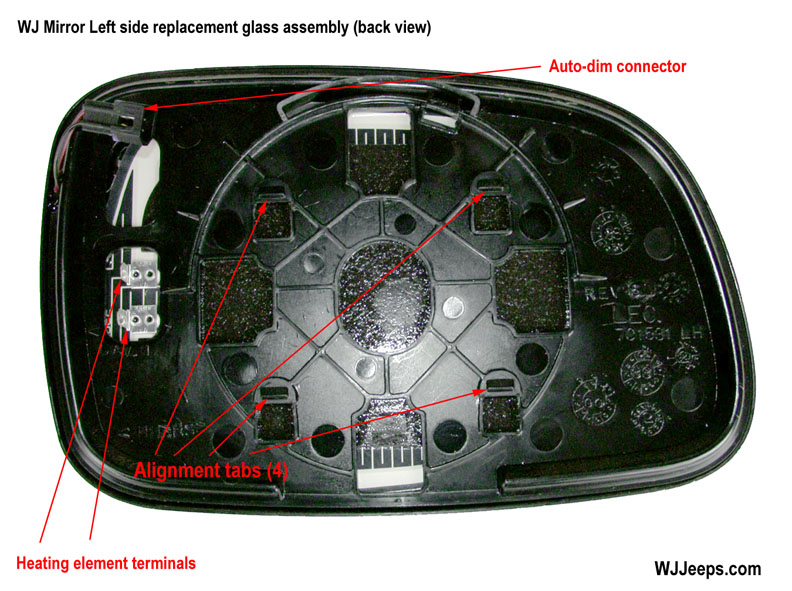
It is unnecessary to replace the entire outside rearview mirror assembly when the mirror glass is damaged or broken. Replacement mirror glasses are available from Mopar. NOTE: SOME REPLACEMENT MIRROR GLASS/HOLDER ASSEMBLIES ARE PACKAGED WITH REMOVAL/INSTALLATION INSTRUCTIONS WHICH SHOULD BE FOLLOWED, BUT IF NO INSTRUCTIONS ARE PACKAGED WITH THE REPLACEMENT GLASS/HOLDER THE FOLLOWING PROCEDURE SHOULD BE USED FOR THE WJ:
|
WJ exterior mirror replacement glass | |||||
| Type | Location | 1999-2004 | MSRP | ||
| Standard, Power | Left Right |
5013637AA 5013636AA |
$76.25 $81.90 |
||
| Heated, Power | Left Right |
5017073AA 5017072AA |
$81.50 $90.45 |
||
| Heated, Power + Auto-dim (Left side only) + Memory (Left & Right side 1999-2002 models; Left side only 2003-2004 models) |
Left Right |
5017075AA 5017072AA |
$302.00 $90.45 |
||
| Note: Prices listed above are for reference purposes only and may vary by dealer. Prices are current as of March 2009 and are subject to change without notice. Parts are not available from this web site. Mirrors and parts can be ordered from our site sponsor JustForJeeps.com. | |||||
In some situations the power mirrors may have difficulty adjusting to their proper positions or remembering their location. Sometimes (but not always!) this is due to dirty components or poor contacts on the potentiometer circuit board inside the housing. To perform the following procedure to clean and check the contacts, the mirror needs to be disassembled. The circuit boards, worm gears and pivot arms need to be cleaned and new grease applied.
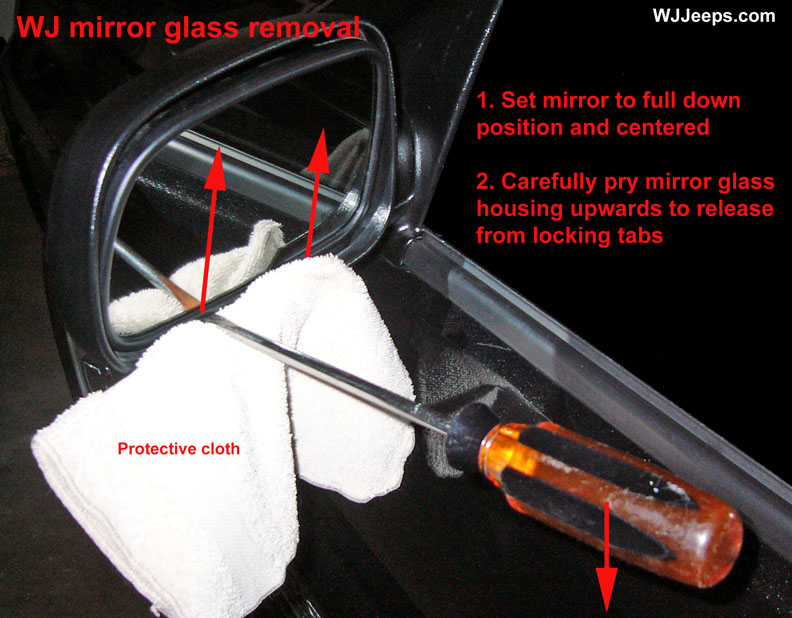
1. Follow the directions above to remove the glass assembly from the mirror. Rolling down the side window will allow for more working room and you can also fold-out the mirror away from the vehicle.
7. Remove each potentiometer circuit board and lift it straight up out of its plastic "socket". The boards should be cleaned with rubbing alcohol and a cotton swab. Reapply dielectric grease after cleaning and reinstall into their slot. If any of the worm gears have dirt or debri on them, clean those as well and re-apply a waterproof grease. Grease and dirt should be cleaned off all other areas inside the motor housing and then reapplied (the only area that get dielectric grease is the circuit board, all other areas use waterproof automotive grease).
8. Reinstall each pivot arm, starting with the contact end, inserting it at an slight angle. Be careful that the contacts are aligned correctly in place. Without the worm screws in place, put a finger on each end of the pivot arm and "rock" it back and forth, this will confirm that the each arm is seated and pivoting correctly. Lift up the end of the arms and insert each worm gear back into place. Double-check that the worm screws and other parts are all resting in their correct slots.
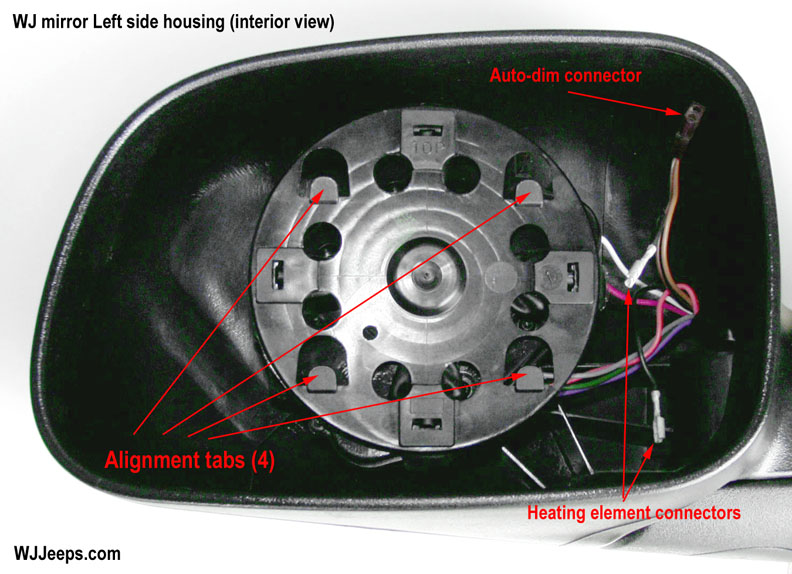
9. Confirm that all 6 wires that protrude out of the motor housing are set into their individual notches along the edge. Reinstall the housing top cover, checking that it is seated correctly all the way around and set into its location in the mirror housing. Remember that the longer screws are in the center area, shown in yellow circles in the photo for step 4.
10. Reinstall the rubber boot, stretching it over and around each of the four pivot arm ends.
11. Add grease to the center socket on top of the motor housing and reinstall the circular mirror backing plate. Start by aligning the plate over the 4 arm ends and over the center socket. The plate is marked "Top" and can only fit on one way. With the palm of your hand, press very hard on the center of the plate until it snaps into place. Next the 4 arm ends need to be snapped into the plate. One at a time, firmly press at each corner to snap the arm tab into the plate. This may also take a very firm push, you will hear them snap into place. Verify the correct operation of the backing plate by rotating it up and down and back and forth, as you would if manually adjusting the mirror. Reinstall the mirror glass, detailed directions are shown here.
Cleaning the power mirror memory contacts
Directions:
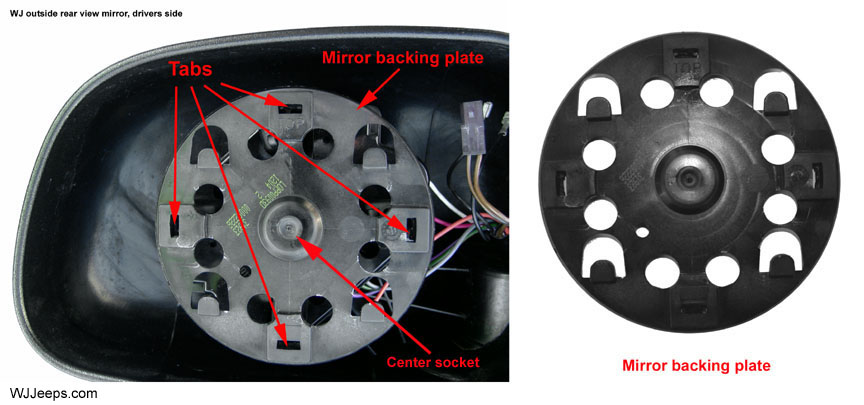
2. Remove the circular mirror backing plate. It is attached to the top of the motor housing with four locking clips, as shown in the photo above. It is also attached into a socket at the center. A tiny flat blade screwdriver works best. Just insert it into each of the 4 slots and pry inward (so as to pry the tab outward) while slightly pulling up on the plate edge at the clip location. You will feel the clip unsnap. Next pull on the plate to unsnap it from the center socket. This takes a bit of a pull to release it. Clean both sides of the plate and re-apply waterproof grease to the center hole on the back side.
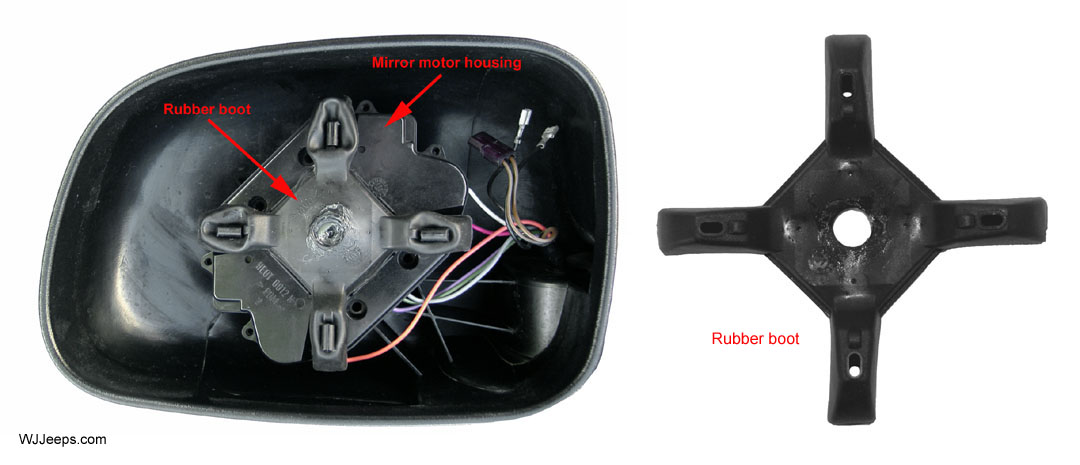
3. Remove the rubber boot. It is pressed over each of the four arm ends. Remove carefully so as to not tear the boot. Clean the boot. If you have some "rubber cleaner" or reconditioner (like what is used to recondition audio pinch rollers for example) apply to the front and back. There are automotive rubber reconditioners available as well.
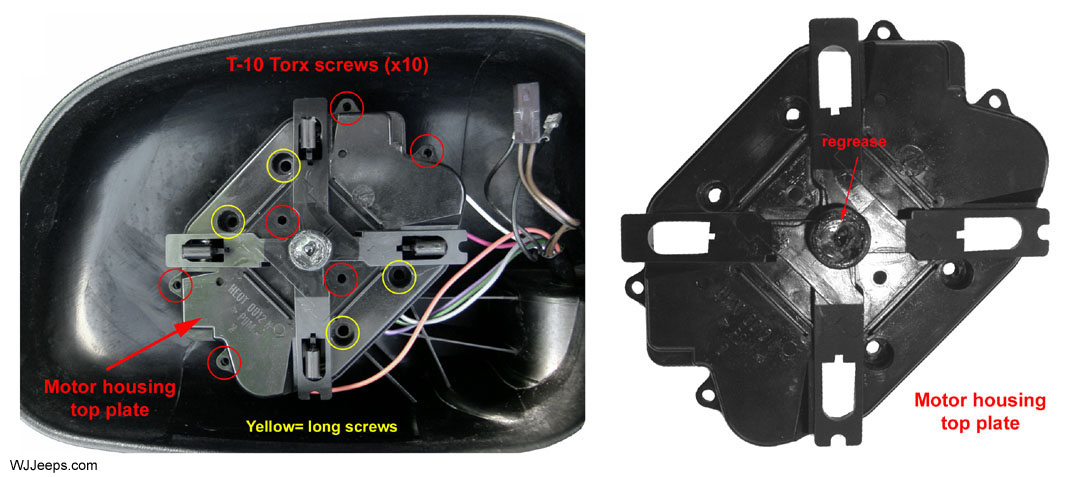
4. Remove the 10 motor housing screws (using a 10mm Torx screw driver). There are 6 short screws that hold the motor case together, and 4 long ones that attach the case to the main mirror housing. The location of the long screws is shown with yellow circles in the photo above. Carefully remove the cover, prying it away at the top. The worm gears and pivot arms are simply set in place and may fall out of place when the top is removed, but they are easily reininstalled later.
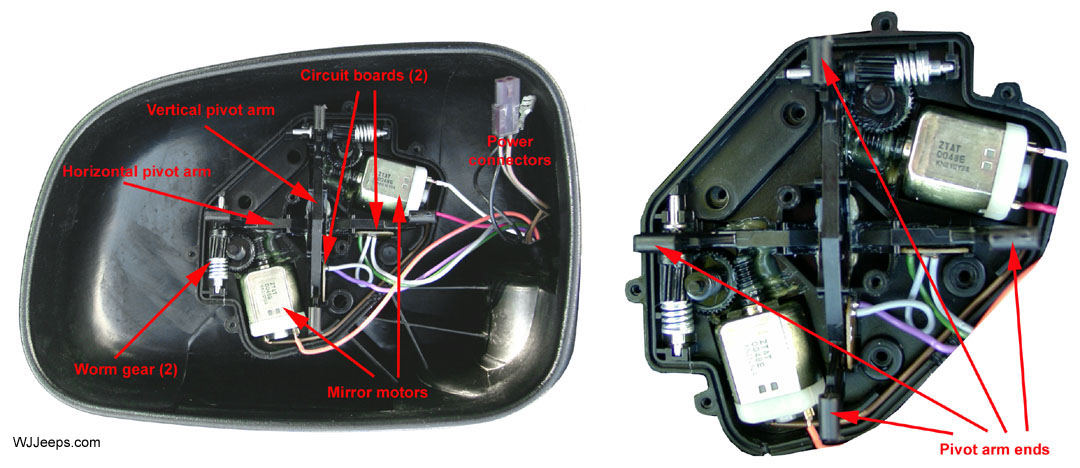
5. The photos above and below show the components inside the motor housing. The next step is to remove the vertical and the horizontal pivot arms. They are simply set in place and not attached with any clips or screws. Lift up on the end farthest from the circuit board and carefully lift each arm out. They are designed as such that they cannot accidentally be put back into the wrong location. Also remove the two worm gears and set them aside.
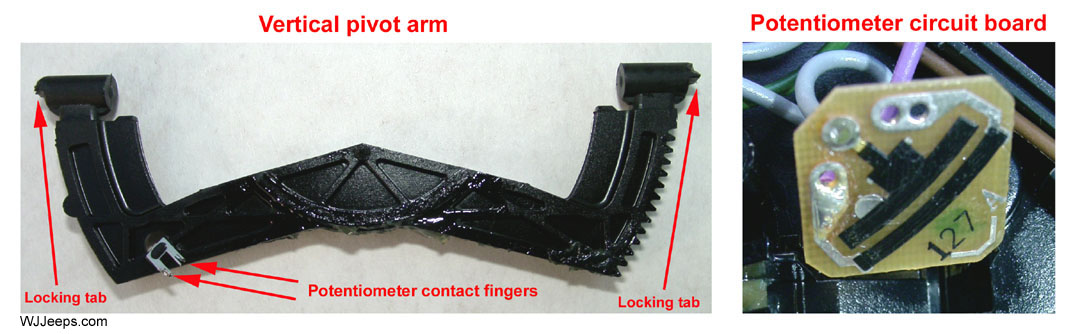
6. Using isopropyl rubbing alcohol (or electrical contact cleaner) and a swab, very carefully clean the contact ends on each pivot arm. Commercial wood stick swabs work better as they are tightly woven and will not catch on the contacts. The contacts are fragile and can bend easily so it is best just to lightly "dab" the sharp-pointed ends. You may also want to carefully pry them out just a tiny bit so as to make stronger contact to the potentiometer circuit board when they are reinstalled. A detail photo of the arm and contacts is shown above. Clean the entire arm as well, grease will be reapplied to the bottom and the gear edge before they are reinstalled.