Home        Main menu


WJ clusters and gauges

Electroluminescent description   02 Gauge layout diagram

White-face gauge options Bulb coloring Cluster removal

Cluster wiring pin-outs 1999-2004


2002 gauges

Electroluminescent gauges are standard on the 02-04 Limited & Overland models.


Electroluminescent gauges technical description:

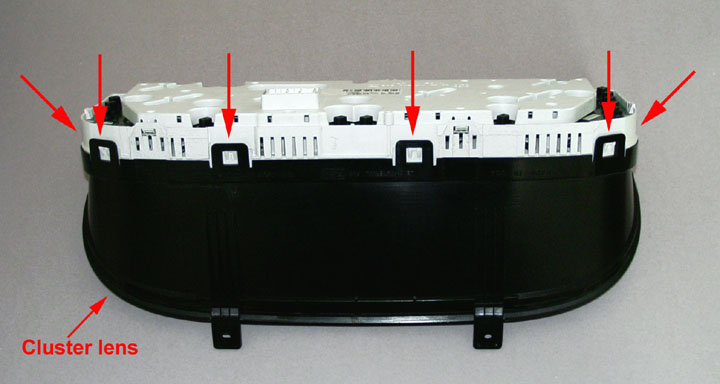
This new instrument cluster is an ElectroMechanical Instrument Cluster (EMIC) module. The EMIC, including the mounts and the electrical connections, are concealed behind the cluster bezel. The EMIC gauges and indicators are protected by an integral clear plastic cluster lens, and are visible through a dedicated hooded opening in the instrument panel top pad. Just behind and integral to the cluster lens are the cluster hood and cluster mask, which are constructed of molded black plastic.

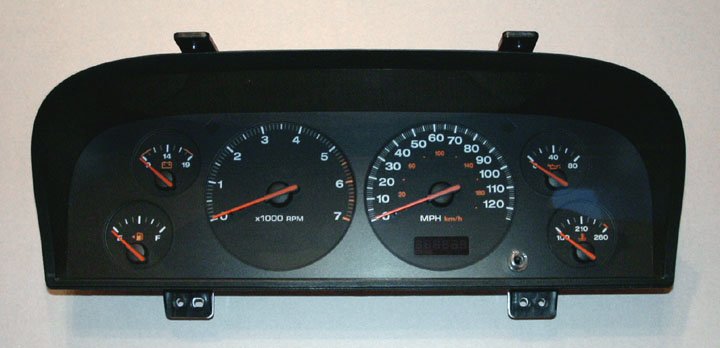
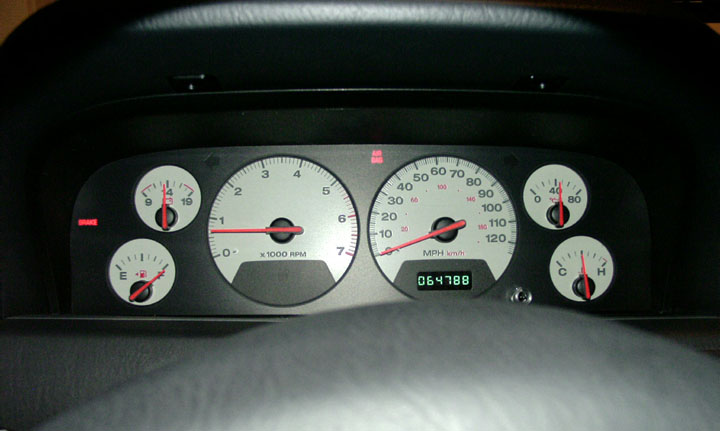
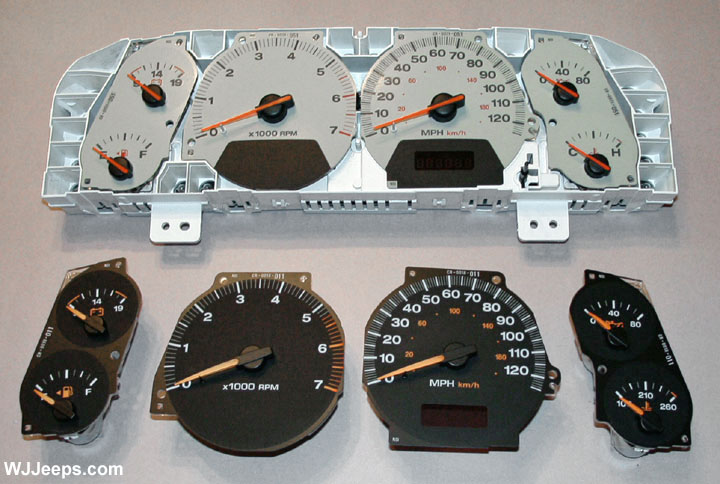
Two cluster masks are used: A base version features a black matte face and no trim ring around the perimeter of each gauge opening, while a premium version features a black matte face and a raised trim ring around the perimeter of each gauge opening. The cluster hood serves as a visor and shields the face of the cluster from ambient light and reflections to reduce glare, while the cluster mask serves to separate and define the individual gauges of the EMIC.

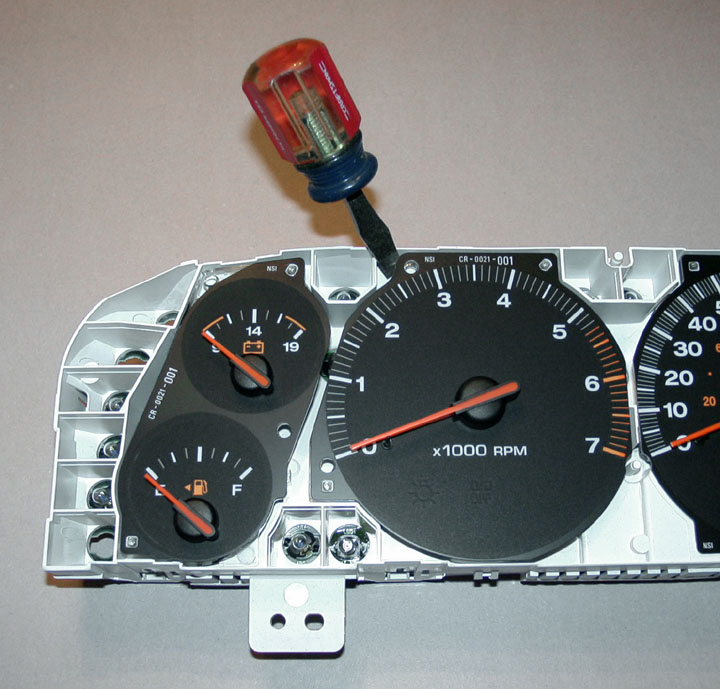
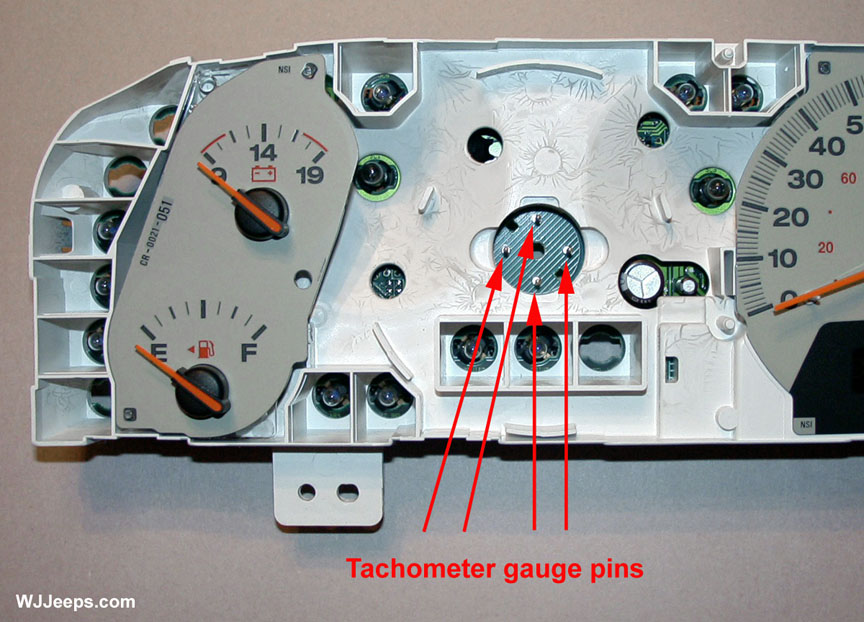
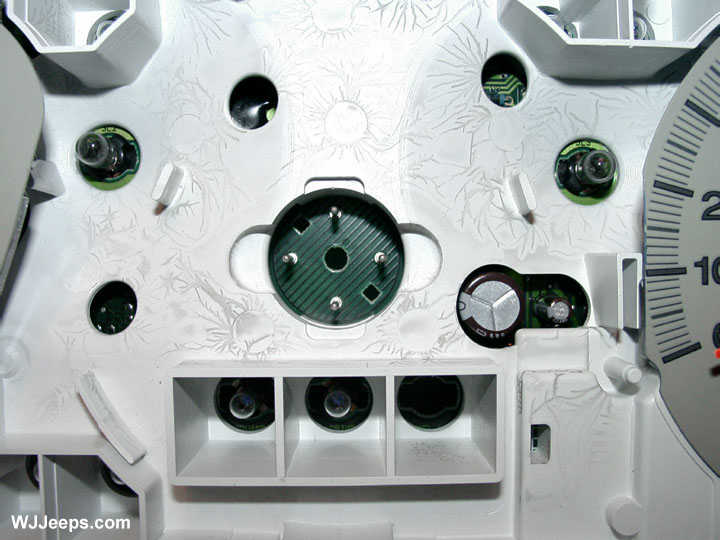
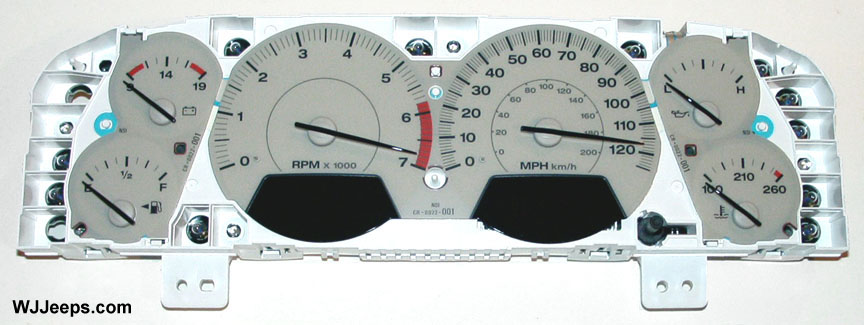
The cluster mask features two large round openings near its center through which the two major gauges are visible, and two smaller round openings stacked at the outboard side of each of the large openings through which the four minor gauges are visible. The cluster mask and the dial faces of the gauges are laminated plastic units. The dark, visible surface of the mask and the gauge dial faces are the outer layer or overlay, which is translucent. The darkness of this outer layer prevents the cluster from appearing too cluttered or busy by concealing the cluster indicators that are not illuminated, while the translucence of this layer allows those indicators and 1 icons that are illuminated to be readily visible. The underlying layer of the cluster mask overlay is opaque and allows light from the various indicators behind it to be visible through the outer layer of the mask and gauge dial faces only through predetermined cutouts.

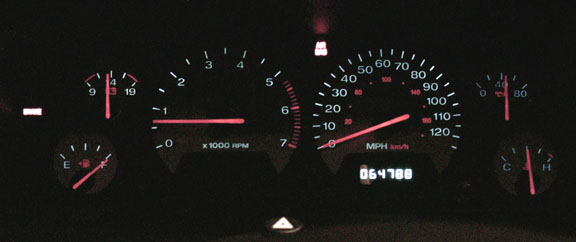
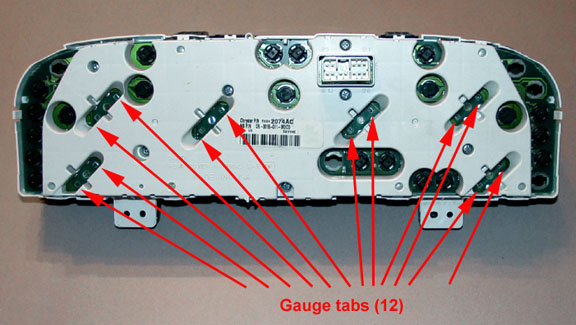
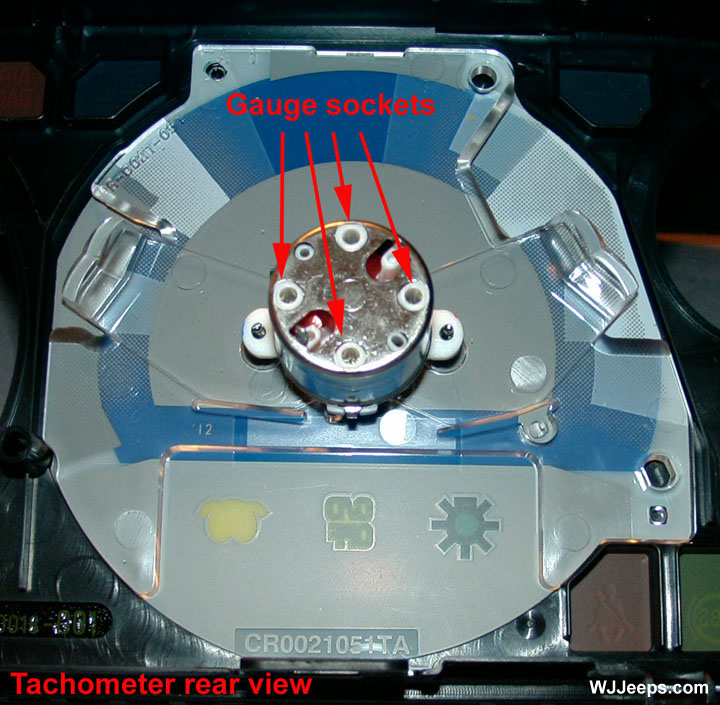
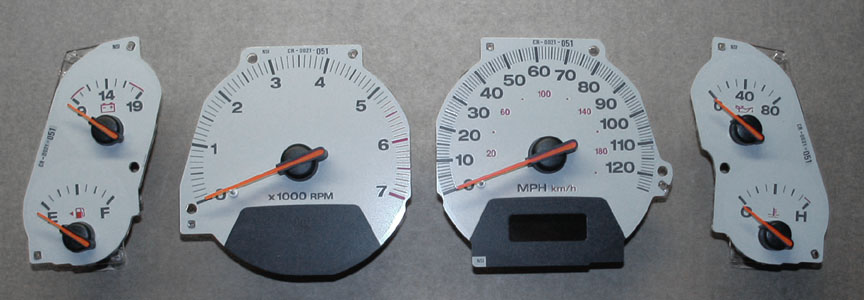
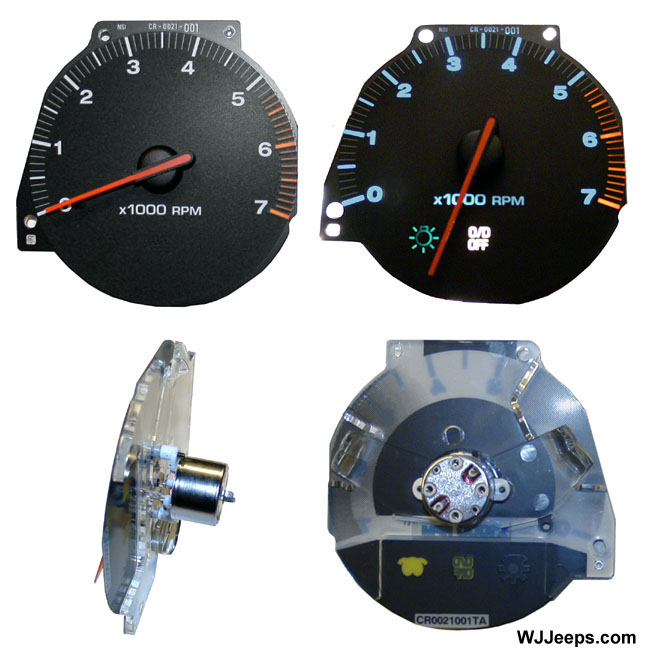
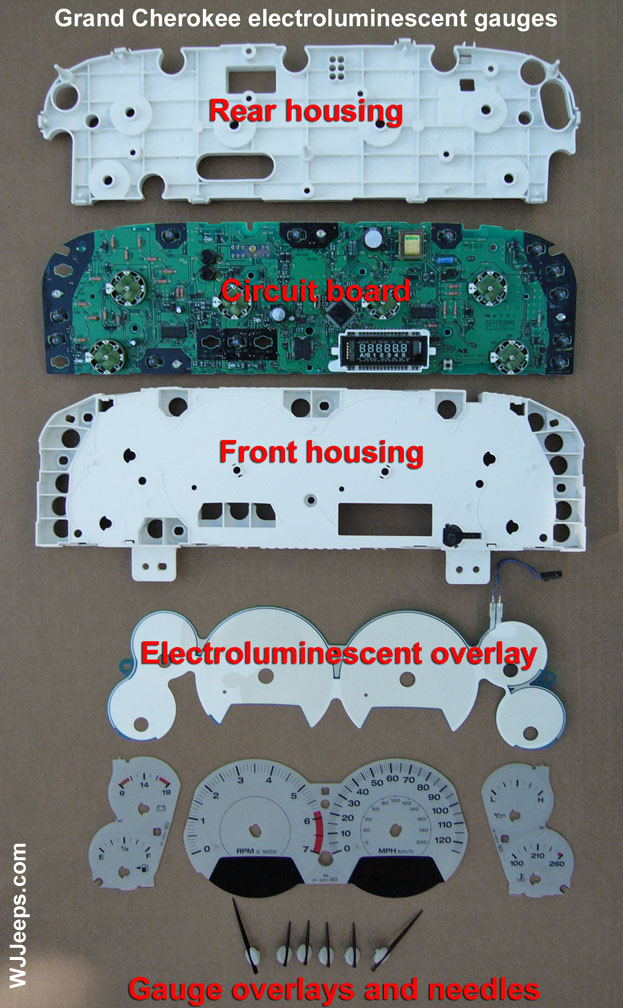
On the base instrument clusters the graphics, increments, and numerals on the gauge faces are also translucent and illuminated from behind, while the orange gauge pointers are illuminated internally. On the premium instrument clusters the graphics, increments, numerals and gauge needles are opaque while the remainder of the gauge faces are translucent and illuminated from behind by an electroluminescent lamp. The EMIC electronic circuitry is protected by a molded plastic rear cover that features several round access holes for service of the incandescent cluster indicator and illumination lighting lamps and a large rectangular access hole for the EMIC connector receptacle.


Gauge diagram

Twelve versions of the instrument panel module are offered on Grand Cherokees, two base and ten premium. These versions accommodate all of the variations of optional equipment and regulatory requirements for the various markets in which the vehicle is offered. This module utilizes integrated circuitry and information carried on the Programmable Communications Interface (PCI) data bus network for control of all gauges and many of the indicators.


2001 and 2002 clusters

Note the styling differences between the 2001 and 2002 gauges


White-face gauge upgrade options


2002-2004 Limited/Overland Gauge cluster and housing


Cluster swapping

Many owners have inquired as to whether they can buy the Limited/Overland white-face gauge clusters and install them into models that have the black gauges. Unfortunately, gauge clusters are only available on an exchange basis through the dealer, and only for the matching cluster type and model year. They must also be reprogrammed for mileage. This policy is usually strictly adhered to in order to maintain and control odometer integrity. However, used gauge clusters are widely available on internet sales and auction sites for just about any model year. But there is still the mileage issue if a cluster is swapped out, and there may incompatibilities with some of the warning and message lights as well as the wiring.

It is physically possible to install, for example, the 2002-2004 electroluminescent clusters into 1999-2001 WJ models, and all of the gauges will work perfectly. However, the odometer *might* retain the previous mileage from the vehicle it came out of, or "000000" if it is new and would need to be reprogrammed. Some of the other functions, like the seat belt warning light may not work so this may not the best upgrade choice. We have recently heard of one case of a '99 owner who successfully swapped an '04 electroluminescent gauge cluster into a '99 Laredo and had no issues. Your mileage may vary.

December 2011 update - Newly confirmed case of an owner taking an electroluminescent cluster out of a 2002 Limited and using it in a 2000 limited. The owner did nothing more than unplug the factory cluster and plug in the new one. The cluster retained the odometer reading from the first Jeep. Everything is functional with nothing else needing to be done.

For 2002-2004 owners having the black gauges, if a 2002-2004 Limited/Overland cluster could be obtained, it would plug right in and most likely all functions would work. As above, the odometer will retain its original mileage and would need to be reprogrammed by a certified shop. I am not aware of any minor cluster control changes between 2002-2004, but this still needs to be verified.


Gauge swapping


The first photo shows the stock gauges while the other three show the upgraded Limited gauges


Some owners have installed 2001 Limited white face gauges into 1999 and 2000 Laredo models, purchasing just the individual gauge assemblies and installing them into their existing cluster assembly. Most likely the same thing can be done (installing a set of 2001 Limited gauges) into 2002-2004 Laredo models. 2001 is the only model year for which gauges can be purchased individually. This is a desirable upgrade as this method bypasses the added expense, exchange hassles and problems associated with trying to obtain an entire cluster, as the original odometer is left intact. However, buying a new set of the '01 Limited gauges can set you back more than $400 plus installation (2008 update: The 2001 individual gauges have been discontinued and are no longer available from Mopar).

NOTE: 2002-2004 electroluminescent gauges that come on the Limited and Overland models cannot be individually removed from the cluster housing as they are sandwiched between the cluster housing (see "exploded view" photo showing the electroluminescent cluster parts at the bottom of this page).


Installation instructions for upgrading to the Limited gauges:


A.
   

B.
   

C.
   

D.


1. Remove the cluster from the vehicle as shown in the "Removing the gauge cluster" section below.

2. Lay the cluster upside down on a soft towel. As shown in figure "A", each gauge has a pair of metal tabs (12 in all) that secure the gauge to the circuit board. Bend each tab upwards with a small screwdriver or pair of needle-nose pliers. All of the tabs are accessible without removing the white rear plastic cover. Figure "B" shows a close-up of a pair of the tabs.

3. With a flat blade screwdriver, pry the outer front gauge lens housing away from the gauge cluster assembly as shown in figure "C". There are 8 large black tabs to free and the two pieces can be then separated. Be careful in this process to pull the pieces straight apart so as not to bump against the gauge needles. Also, remove and set aside the rubber piece that fits over the trip odometer reset button.

4. Next remove each of the 4 gauge assemblies. With a small flat blade screwdriver, carefully pry up on the corners of each plastic backing a little at a time. This will free the gauge pins from their sockets. The Tach and Speedometer each have 4 pins while the two sets of double gauges each have 8 pins. The gauges will lift up rather easily, they are not secured real tight.


E.
   

F.
   

G.
   
white gauges

H.


5. Figure "E" shows the back of one of the gauges, the Tachometer, and its 4 sockets. Figures "F" and "G" show where the tach fits onto the circuit board pins. Install each of the 4 gauge assemblies by lining them up with their matching pins. This is very easy to do as the gauge fits into a recess and is easy to align. Once in place carefully press down in the area around the pins, making sure the gauge is seated evenly and firmly. Be careful to not scratch or mar the gauge overlay surfaces while pressing them into place. A tissue can be used wrapped around a finger or two to keep the gauge surface clean.

6. Figure "H" shows the 4 newly installed gauges next to the 4 that were removed. Carefully re-install the front cluster lens, being sure to align the trip odometer reset button into its hole first and then carefully aligning the cluster into the lens. Watch that the needles to not hit against anything. Also check to confirm that there is no dust or dirt particles inside the lens before latching it firmly in place. The cluster can now be re-installed into the vehicle, as described in the section below.


2001 Limited gauge set

(Note: The 2001 individual gauges have been discontinued and are no longer available from Mopar)

2001 gauges

GaugePart #MSRP
SpeedometerP/N 5018112AA$93.90
TachometerP/N 5018113AA$89.95
Temp & OilP/N 5018114AA$117.00
Fuel & VoltP/N 5018115AA$120.00
(Prices listed are for reference purposes only and may vary by dealer. Parts are not available from this web site. Prices are current as of February 2007).


White-face gauge overlays

White-face overlays for WJ models are only available in the "split" style, made of vinyl and designed to slide around the needle center pin. These can usually be found on eBay. Several years ago some "uncut style" plastic overlays were manufactured, but it was found that once the gauge needles were removed they could not be reinstalled without being out of alignment. A solution was never found and the project was abandoned.


Owners of 1987-2002 YJ/TJ Jeeps looking for white-face gauges should check out JeepWhiteGauges.com


Changing OEM clear backlighting bulbs to color bulbs

Factory gauge overlays are made of thin plastic. The numerals and markings are printed on the overlays in blue and are back-lit with 5 clear bulbs that can be removed from the back of the cluster. The bulbs can then be replaced with different color bulbs, painted different colors, or colored sheaths that go over the clear bulbs can be installed. Different results will be achieved with different color bulbs or bulb covers, but all will be "mixed" with the factory blue that is on the overlay. I will try and provide some pictures in the future of different results achieved with using colored bulbs.


Laredo gauges

Factory gauge shown unlit, with back lighting (out of cluster), side view and back view


Gauge lighting

There are 5 clear bulbs in the cluster that provide backlighting for the WJ black-face gauges


Removing the gauge cluster


Gauge bezel trim
   
Gauge bezel trim

The gauge cluster can be easily removed on all WJ models. First, disconnect the negative cable from the battery. Next, remove the cluster bezel trim piece (shown above left). It is held in place by 4 spring clips, one at each corner, and pulls straight out. On the left side, you can reach your thumb behind the bezel rubber at the tilt wheel lever cut-out and pull forward. If so equipped, you'll need to unhook the Adjustable Pedals harness from the back of the bezel.

Next, remove the 4 phillips screws on the cluster assembly, two along the top and two on the bottom. At the two upper screw holes there are recessed tabs that must be slightly pried down to release the cluster, which you can then pull outward and away. There is plenty of slack allowed to unhook the single 9-wire/12-pin connector.


WARNING: On vehicles equipped with the premium instrument cluster, the cluster circuitry provides an alternating current to supply power to the electroluminescent illumination lamp through a pigtail wire and connector that is accessible at the back of the cluster housing. Use proper precautions when handling this unit during diagnosis or service to avoid electrical shock and possible personal injury.


Front and back of the 2002 Electroluminescent cluster. Amazingly, the entire cluster assembly with hood and clear lens weighs only 38 ounces.


Exploded view showing the electroliminescent gauge assembly parts


1999-2004 Grand Cherokee cluster pin-outs.


Home     Main menu